Follow us


Brewing your own beer can be very rewarding. In the first place because of the product, you create, but what might matter just as much: for the skill, knowledge, and creativity you put into it. The process starts by selecting ingredients and heating them in a controlled manner to extract all the sugars (mashing). After cooling down, fermentation begins by adding yeast. When fermentation has finished, you can add hops (dry hopping) or other ingredients to further develop the flavor. Finally, you bottle your brew and wait for it to reach its final form (lagering). Along the way, there’s a lot of cleaning and monitoring involved, to ensure that your beer shines the way you intended it.
Measuring sugar concentration is a key indicator of how your fermentation is progressing. During fermentation, sugars are primarily converted into alcohol and CO2. Th CO2 escapes from the liquid and causes the density to decrease. By tracking the sugar concentration, you can see how far along the fermentation is. It’s hard to determine sugar concentration accurately because of all the other components in the wort. Instead, the density of the wort/beer can be measured, as this is mainly influenced by the changes in sugar concentration. Brewers often use the term “Specific Gravity” (SG), which is the density of the wort compared to the density of water. Alternatively, the wort can be measured optically; the refractive index changes as the sugar concentration changes. This measurement is often expressed in degrees Brix (°Br) or degrees Plato (°P). Although measurement principles are not the same, SG can be converted to °Br or °P and vice versa to give the brewer an indication of how fermentation is progressing. There are additional measurands used for tracking fermentation and on our My Brewbrain platform, you can choose your preferred display unit. So wherever you read SG in this blog, you can substitute it with your preferred measurand.
Traditionally, you would take a sample of your fermentation every now and then and measure the Specific Gravity of that sample with a glass hydrometer. Working hygienically, you would discard (after tasting it of course 😊) the sample; by sampling often you reduce the amount of finished product. But with few samples you only see a small part of the journey your brew is on. With the Float Pro you can monitor your brew remotely in our free My Brewbrain platform. The Float Pro automatically measures SG and temperature every 15 minutes so you can follow your brew in real-time. By measuring SG continuously instead of taking only a few samples, you can follow the performance of your yeast and act when needed. And when your brew is finished you can review the measurements to improve your next brew.


The image above is from an actual brew from the My Brewbrain platform. This brew was based on a recipe for a Weizen beer. My Brewbrain shows real-time fermentation data as gathered by your digital hydrometer.
Let’s first go through the phases of a typical beer fermentation. I’ve laid them out on top of the graph to help visualize them:

Ideally, everything goes well with your brew. You’ve checked regularly and went to bed comfortably, knowing your beer is going to end up just fine! In this case you can use the fermentation graph from your brew as a reference for the next time you make a (similar) brew. If you use an off-the-shelf ingredient kit or a recipe made by someone else, you will likely be advised what starting SG and final SG to look for. Check the start and final specific gravity and compare them to what you expect from your fermentation. If all is well, you can follow the next step in your recipe’s instructions (dry hopping, bottling etc.).
But if something goes wrong during fermentation, you want to act quickly. Here are some examples of issues that you can detect during primary fermentation, when using a Float Pro. The examples won’t cover everything, but hopefully they will help you interpret the data in your graph.

Specific gravity should start dropping after 1-2 days. If this is not the case, you might still be able to save your brew. Typical causes and actions:

The specific gravity seems to stabilize well above the expected final value. Typical causes and actions:

Hold your horses! The specific gravity is going down way too fast. This is likely accompanied by a strong temperature rise. Typical causes and actions:
Every brew is different. Even when using the same ingredients and amounts thereof, there are other factors that will influence the process. If you check the graphs on My Brewbrain often, you will start noticing subtle differences between each brew. The Float Pro digital hydrometer is your visual aid during fermentation.
Track your fermentation with the free My Brewbrain platform. You can even share your brews with your friends. Compare brews and learn from each other! We brewers love to share our knowledge.
This post should give you an idea of how you can look at your fermentation graph. Keep checking our blog as we will write more about what you can learn from your fermentation data.
We love to stay in contact with our brewers so feel free to comment on this blog. Or reach out to us via email at support@brewbrain.nl. We’re there to provide support and are always welcoming your ideas on what to improve next.
Have fun fermenting!
Cheers🍻
Eric Stricker
(Founder/Engineer)


Our journey that became Brewbrain with its digital hydrometers, started in 2017, in the evenings after work. We wanted to combine our love for measuring and creating sensors with brewing beer. I personally love how nature and technology can contrast with each other and at the same time work together in harmony. Brewing is a creative process and, just like making music, you must feel the result you are creating. With that in mind, we set out to improve the brewing process by making products that give more control and insight into what you are doing.
We had worked out quite a few measuring principles for tracking the specific gravity of a brew. Do you remember the beerbug? Or PLAATO’s Airlock? We also had this idea back in the day, but it didn’t feel like the best path to take. We were working on a principle that calculated the density from flotation angle and then stumbled upon the iSpindel where this was already done. We assembled a few and quickly thought “brewers want to spend time brewing, not DIY-ing brewing equipment”. Not only was soldering messy, calibration was difficult and often inaccurate and on top of it all you needed to set up your own logging environment. And that is why we created Float: a digital hydrometer that works out of the box with no hassle for the user.

We believed that the Float would make a difference in the brewing scene and took a leap of faith and became a startup. Back then there were four of us, each with a love for engineering and of course: beer. It has been an amazing journey and boy did we learn a lot. Sadly, we have had to part ways with Steve and Bart, but Thijs and I are dedicated to showing the world what our designs have to offer. We have grown a lot and are committed to creating durable products that last. We care for the environment and are grateful for our customers, which is why we do our best to make sure a device keeps working and repair it when possible. We value transparency and will back up the claims we make, so that you can trust the product that you are using.
The Float digital hydrometer was released in 2020 and we have learnt a lot from our brewers. And so the time was right to create a new version that performs even better and is usable by the pros. Being the nerds that we are, we poured our heart and soul into the design. We wanted to pack wireless charging in there and make the design as smooth as a good beer going down your throat. We felt that when using a digital device with no screen, you need more feedback on what’s going on, so we included a neat multi-color lid that lets the Float tell you if everything is going like it should. We had developed a custom simulation that models at which angle the device Floats, so that we could optimize the weight and center of gravity to get more accurate readings. The housing is sealed by a seamless ring that stays in place due to its unique design. No hassle when (un)tightening the lid and you can trust the seal to do its job when fermenting under pressure.
There’s so much more I would like to tell you about the development of this digital hydrometer, so I will, in the upcoming blog posts. Follow our blog for deep dives into all the aspects of the design. We will also be telling you how to get the most out of your Float Pro and we will announce all the updates that we will be giving for the device and our online platform my.brewbrain.nl.
We love to stay in contact with our brewers so feel free to comment on this blog. Or reach out to us via support@brewbrain.nl. We’re there for support and are always welcoming your ideas on what to improve next.
Last but not least: The best wishes for 2026🎉. Make this an awesome year and your beers even better!🍻
Cheers🍻
Eric Stricker
(Co-owner)
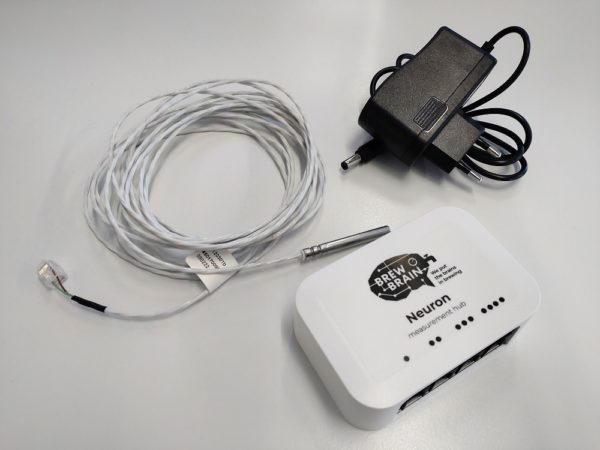
We will soon start selling the Neuron in stores – a tool that will make your brewing process a walk in the park!
Brewing beer is a complex, time-consuming and delicate process in which every step has a certain purpose and is to be executed with care. Oftentimes making beer is a race against the clock in which an extra hand is very helpful.
To make this process more easy, we developed the Neuron.
Mashing might take up to a few hours and if you deviate too far from the temperature schedule, your brew might not turn out how you want it to. See what’s happening during your mash by using the Neuron to measure temperature at multiple locations in your kettle using multiple temperature probes.
The fermentation process is a cumbersome step which easily takes more than a week. What a waste it would be to mess this up.
Get a better grip on your fermentation by measuring CO2, pH, ORP, and pressure.
So your brew is done, but are you storing it correctly? Measure the humidity and temperature of the room the Neuron is in.
You’ve already got sensors laying around and don’t want to spend money on new ones? Hook up your own analog and/or digital sensors, and record the data to your free My Brewbrain account using the same Neuron.
We currently have the following set available for order in Europe only, for EUR 100 ex shipping:
– 1x Neuron measurement hub, which measures room temperature (acc. ±0.5 °C) and humidity (acc. ±3% RH)
– 1x Power adapter 100- 240 V 50/60 Hz, plug type C
– 1x Food-safe, water-proof temperature probe with 5m cable (acc ±0.5°C, usable from -40 to + 110 °C).
Additional probes are available for EUR 30.
Interested? Send us an email via neuron_sales@brewbrain.nl
Keep checking our blog – we will let you know when the other features are available for sale.
Cheers!
Eric

